Managing subscriptions in RuStore Console
In RuStore Console, you can view and manage subscriptions that users purchased in your app integrated with Pay SDK — only subscriptions created via Pay SDK are available.
Access requirements
In RuStore Console, subscription management is available to users with the following roles:
- company owner;
- administrator;
- financial manager;
The subscription management functionality appears in the console only after monetization is enabled.
- If monetization is not enabled, the app owner will be prompted to enable it. Users with other roles will see a notification that monetization must be enabled by the owner.
Available features
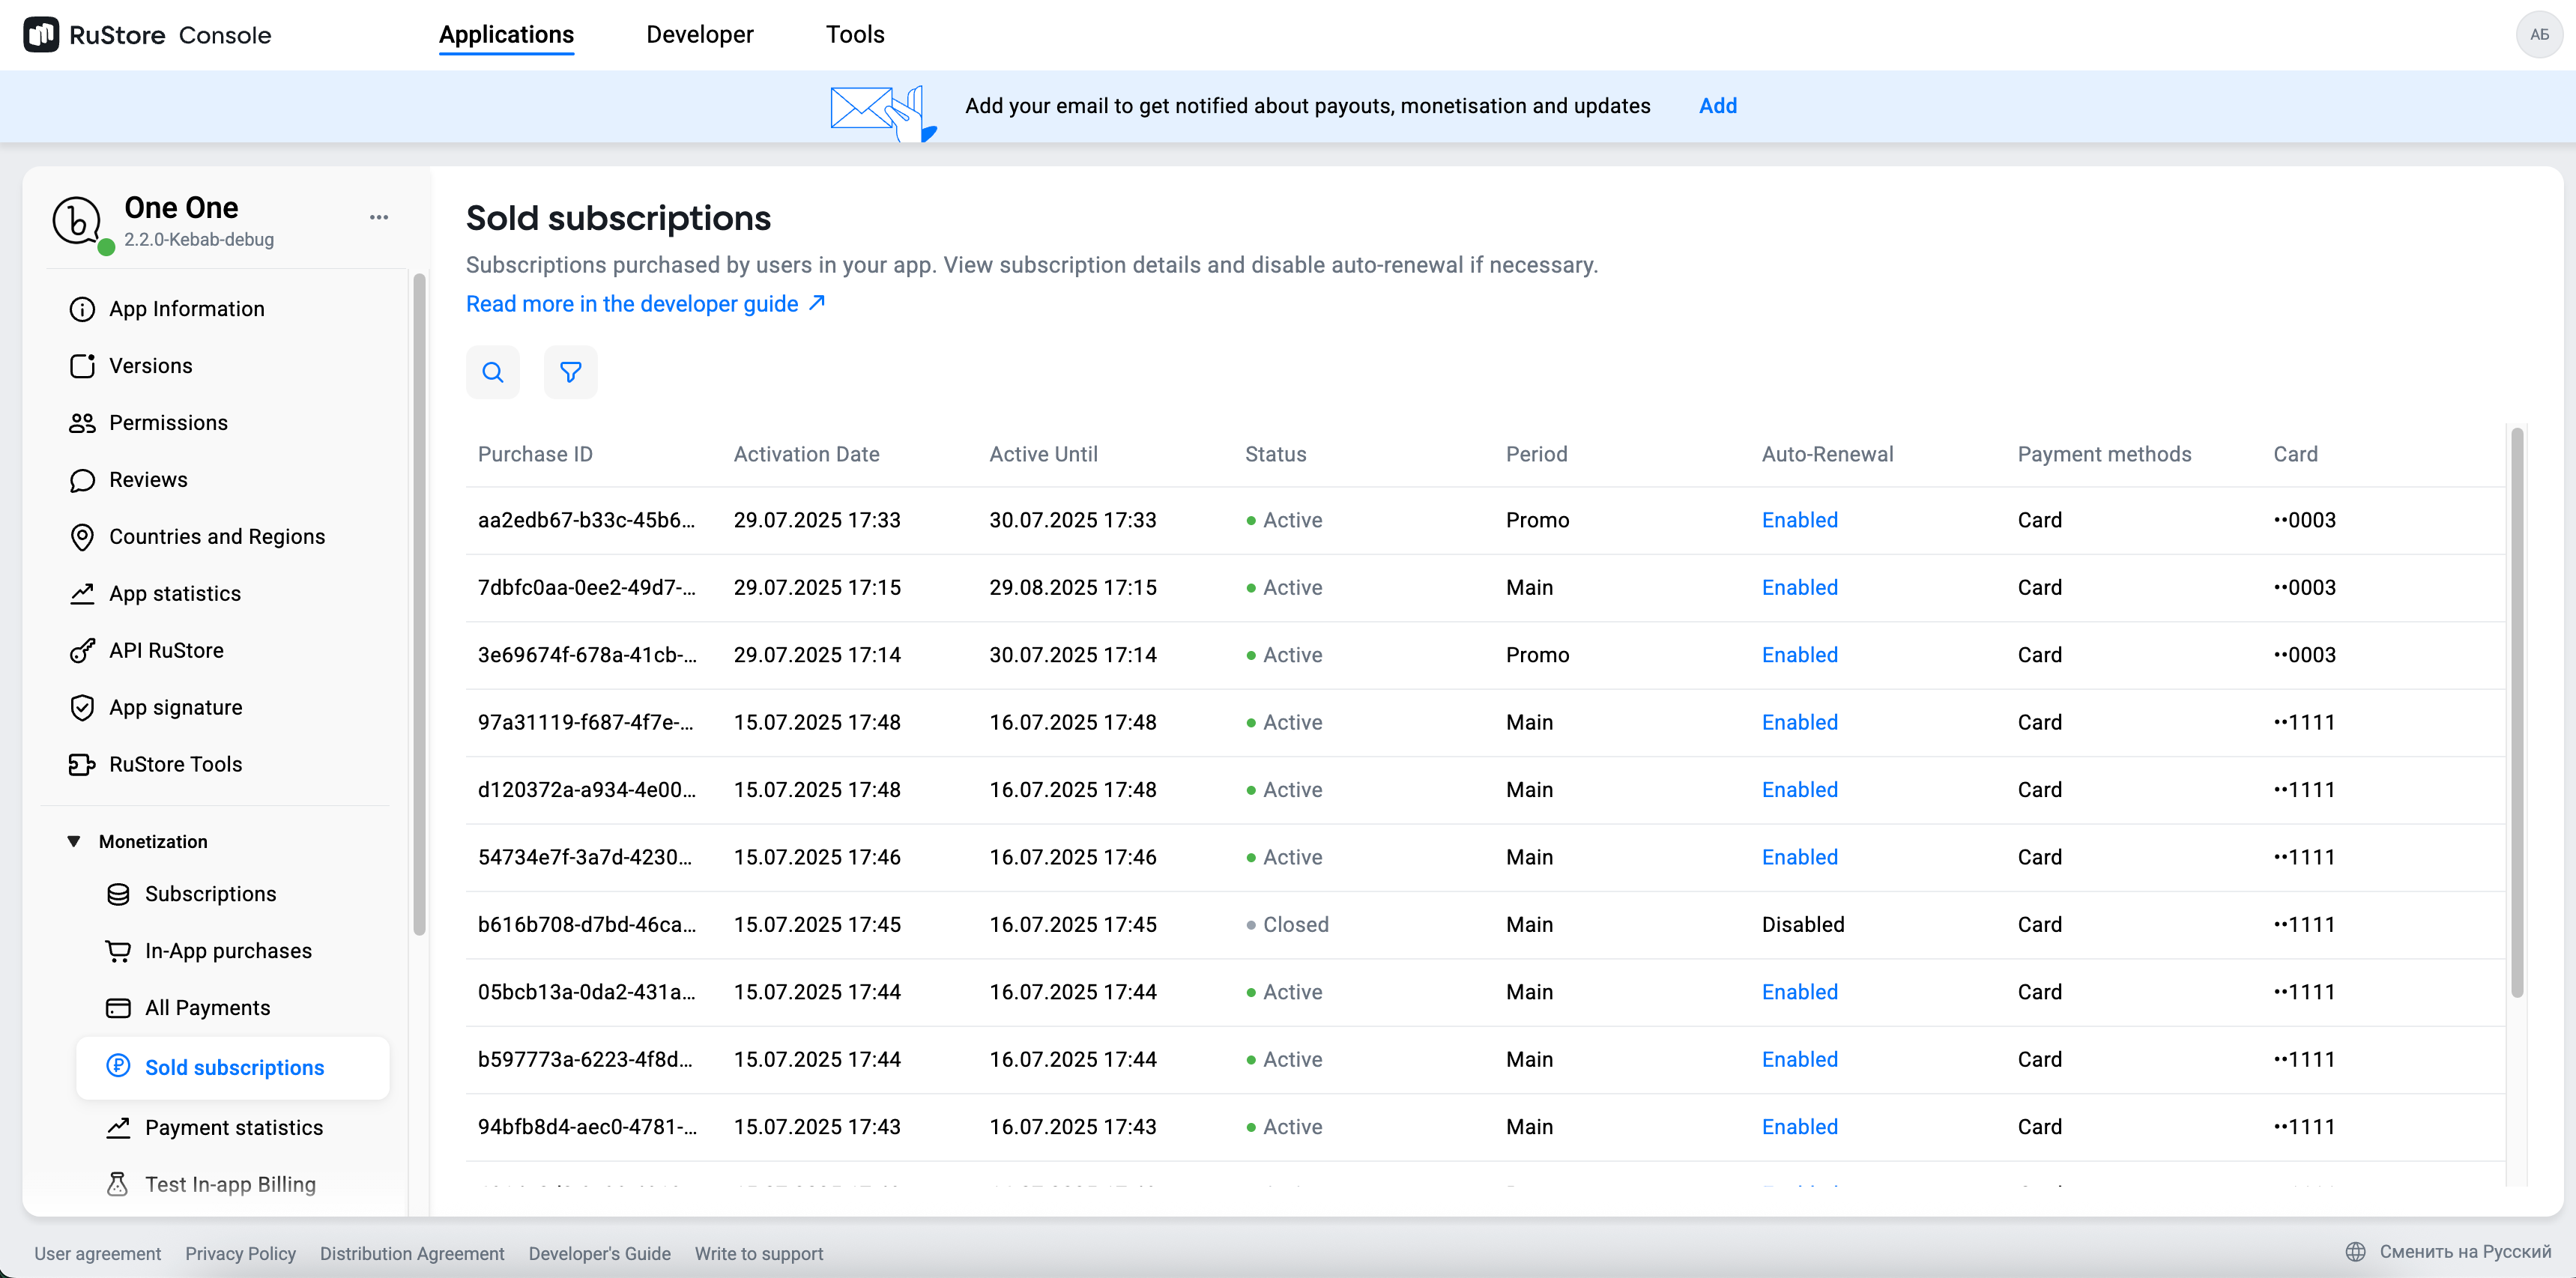
Viewing and filtering subscriptions
The console interface shows all subscriptions sold in your app. Search is performed by Purchase ID (purchase ID), and you can filter subscriptions by the following parameters:
-
Product ID — a unique product code that you set when creating a subscription in RuStore Console.
-
Activation date — the date when the user purchased the subscription.
-
Subscription status — the current state of the user’s subscription:
- Active — the subscription is valid and access to content is available.
- Paused — the payment failed and the subscription is temporarily paused.
- Cancelled — the subscription was cancelled by you or the user.
- Stopped — charge attempts have ended — the subscription stopped automatically.
-
Product title and description — the data you specified when creating the subscription.
 tip
tipHow to find the purchase ID
- Purchase ID is a unique transaction number that you can find:
- via RuStore SDK in purchase information;
- in the receipt sent to the user after payment;
- in the user profile in RuStore in payment history.
- Receipts can also be found in VK Messenger under Business notifications — RuStore notifications.
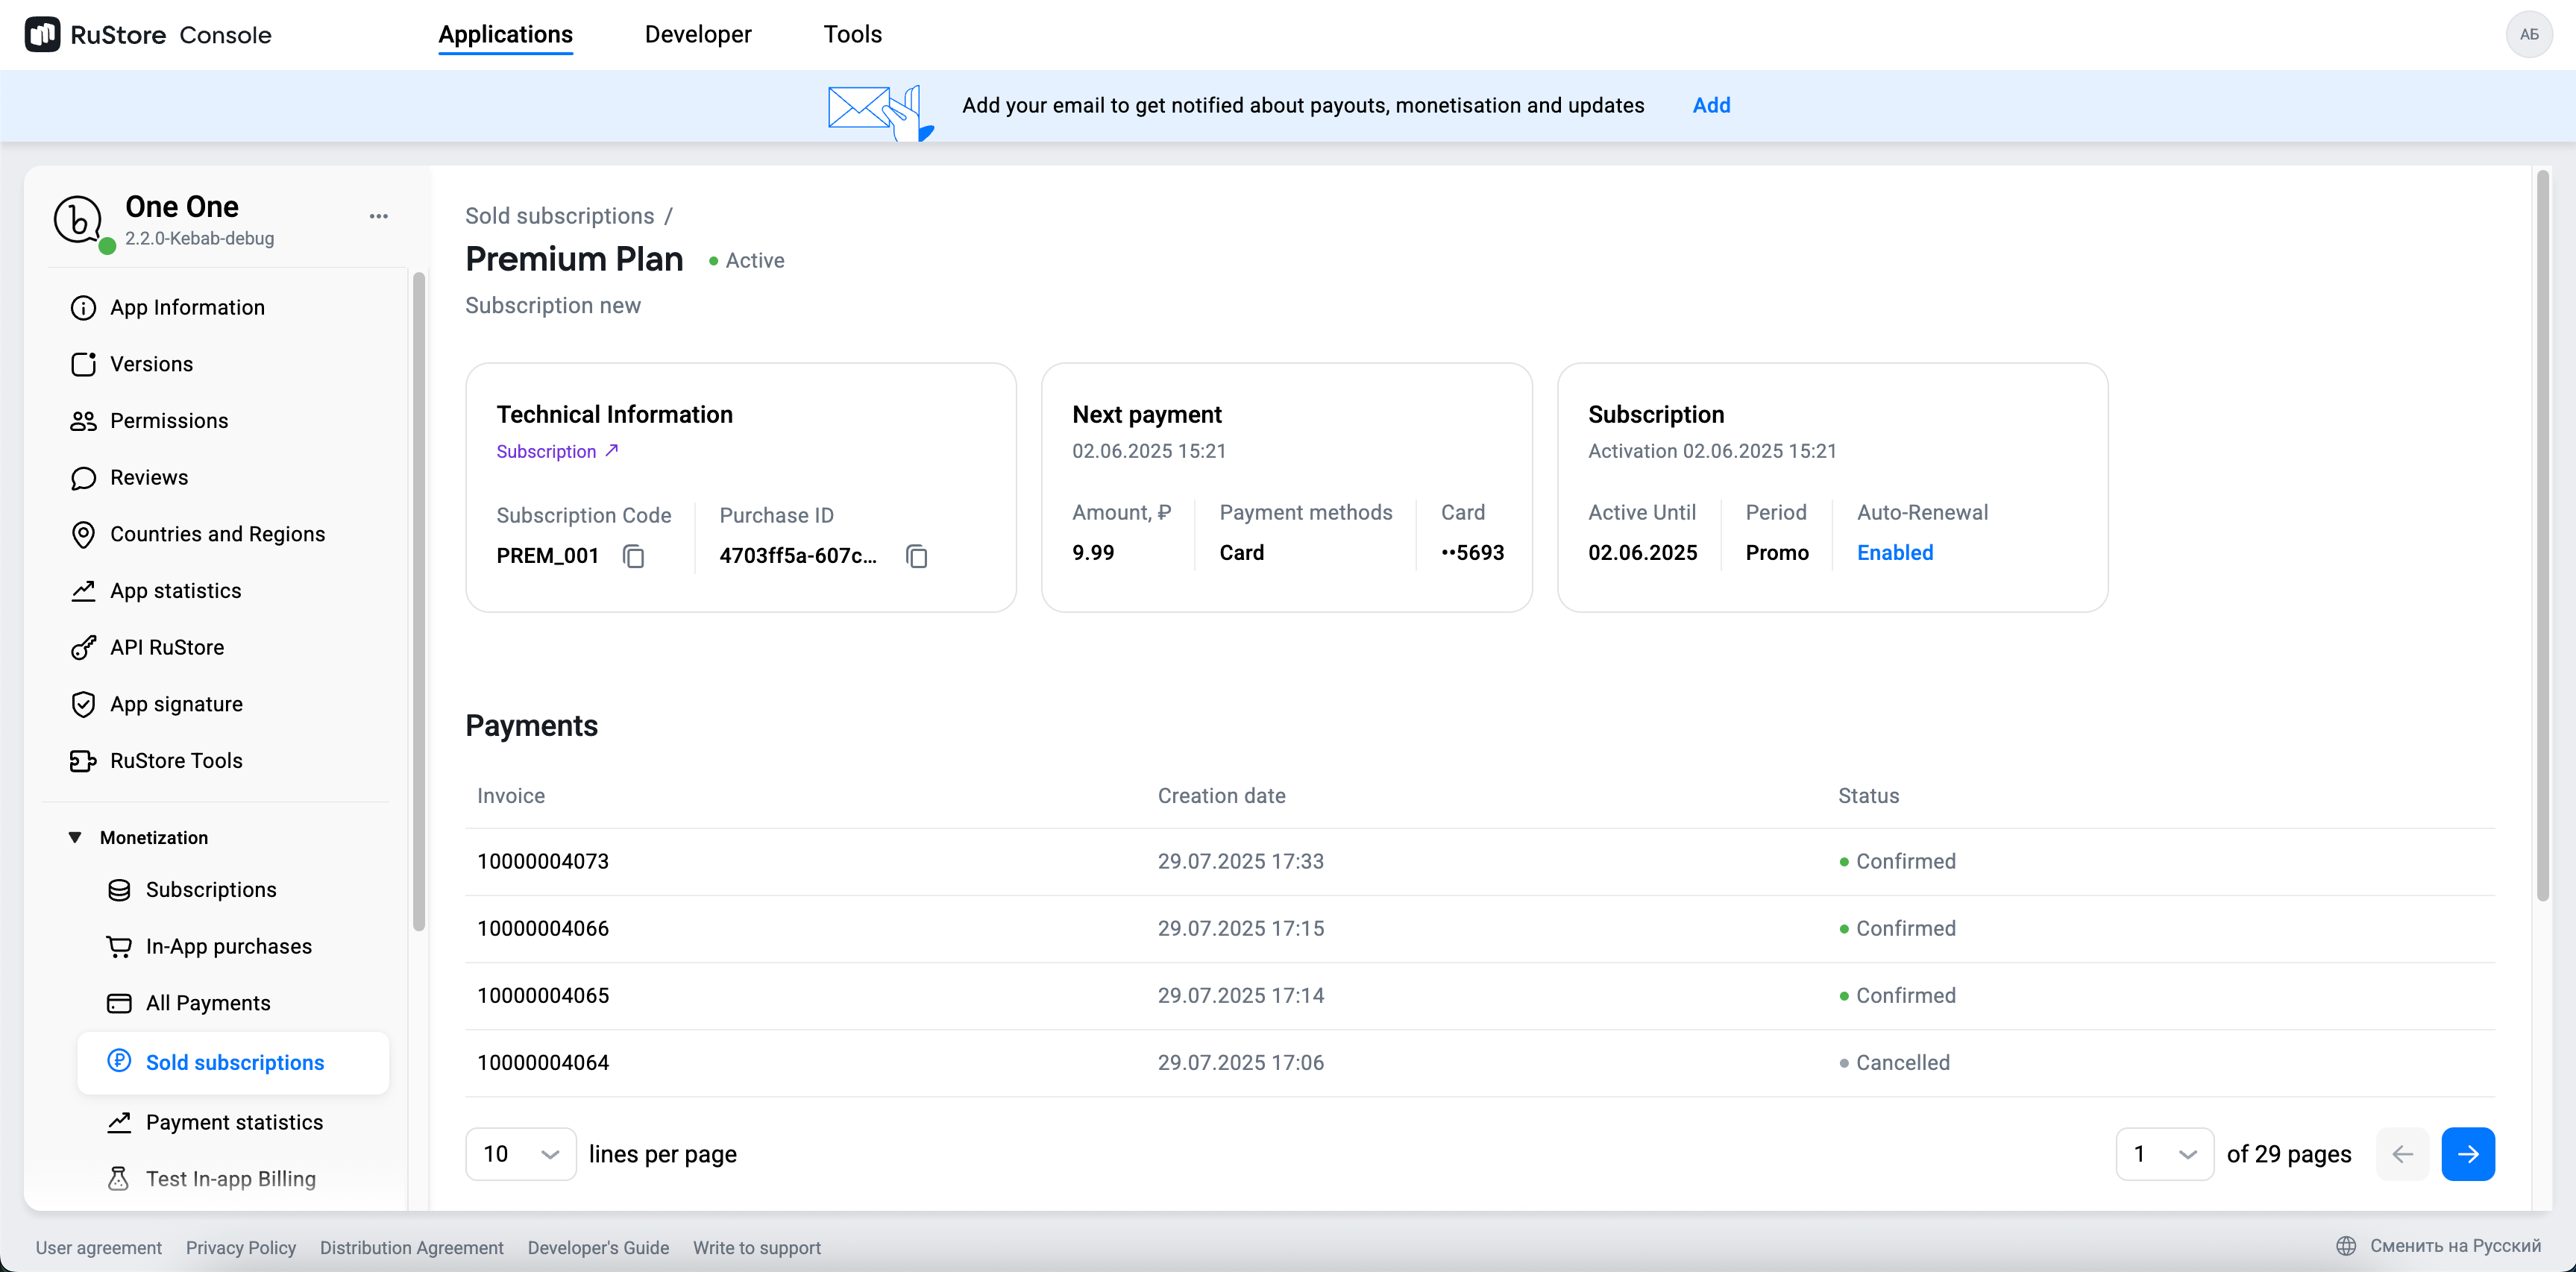
Subscription details
You can get detailed information for each subscription:
-
Activation date and time — the exact moment when the subscription starts.
-
Next charge date (“Active until”) — the date when the next automatic charge for the subscription will occur. If auto-renewal is disabled, the subscription ends on the paid period end date with no further charges.
-
Subscription period — the stage of the subscription lifecycle:
- free — trial free period.
- starter — subscription period with a promo price.
- main — main period with regular charges.
- grace — a grace period after a failed charge attempt, during which the subscription is considered active but payment has not been received yet. The user retains access, and charge attempts continue.
- hold — a period during which the subscription is considered inactive due to inability to charge payment. Access to the subscription is lost, but charge attempts continue.
For grace and hold periods: In these periods, charge attempts continue for the duration specified when creating the subscription (for example, if grace and hold periods are set to 7 days each, charge attempts will be performed daily during these 7 days). More details:
-
Payment history — a list of all payments with dates and statuses.
Managing auto-renewal
In the console, you can disable subscription auto-renewal. If auto-renewal is disabled, the subscription ends on the paid period end date with no further charges.
You can disable auto-renewal in two ways:
1. From the subscription list
- Go to the Sold subscriptions section in the Console.
- Find the required subscription in the list.
- In the Auto-renewal column, select Disable auto-renewal for the corresponding subscription.
2. From subscription details
- Open the Sold subscriptions section and select the required subscription.
- On the subscription details page, find the Auto-renewal block.
- Click Disable auto-renewal.
Disabling auto-renewal does not immediately end the subscription. The user will continue to have access to content until the end of the paid period.
Disabling auto-renewal is also available via API (see Cancel subscription)
Refunds
In RuStore Console, there are two refund scenarios for an individual subscription payment:
-
Via the “Payments” section
You can issue a refund directly from the payments section. -
Via subscription details
- Open the required subscription.
- At the bottom of the page, you will see the list of payments for this subscription.
- Select the required payment to open its details.
- Issue a refund.
Both ways let you quickly issue a refund for a specific subscription payment.
Refunding a payment does not cancel the subscription and does not affect its further lifecycle.
After a refund, the user retains access until the end of the paid period, and on the next charge date the payment will be processed as usual.